
MNIST on Jetson TX1 with Torch
What is a NVIDIA Jetson TX1 Development Kit? In short is a quad-core ARM and a 256-core Maxwell GPU packed into a single chip with pretty much all the accessories you need in a breakout board. Here is an unboxing video. I have had the NVIDIA Jetson TK1 Development Kit for a while now and the TX1 it is quite a bit more powerful, though 3x the cost.
Getting Torch Setup
First step is to get the TX1 flashed with the latest Linux 4 Tegra (L4T) along with the full CUDA toolchain. Easiest way is to use Jetpack…here is a video of the process.
Now we have to get the system setup like we did for the MBP on OSX but now on the embedded system. There are some issues when working from the latest code so please look for where I spelled out the gotyas.
So that completes all the dependencies for us to run the MNIST project we will discuss next
MNIST
MNIST is a collection of images of handwritten digits accompanied by the numerical value of that image. This forms a training set and a truth set for converting handwritten digits to their actual numbers. Think of the OCR challenges the U.S. Census Bureau or IRS have…I see this dataset and academic research as beginning to solve this problem and this is a great, small, problem for Deep Learning.
We will be running from soup to nuts on this MNIST dataset: Downloading the data, converting it for our purposes, training on the training data, and evaluating against the test data. All on the Jetson TX1 and using the powerful organizational capabilities of av. Although, one could run on a MBP and eGPU.
Lets checkout the repo I’ve setup for this problem:
Drop to the customized shell:
You should see something like this:
If you haven’t experienced a domain specific shell…Welcome! What has happened to your shell prompt is your path has been radically altered to focus specifically on the problem at hand (MNIST in this case). We will run through a list of commands that are short but cover a lot of ground for us. All the commands are committed to the git repo you just cloned, so feel free to dig in to them at your pleasure.
There are many examples on github that use a modified version of MNIST data on Yann Lacun’s site in T7 format. But that’s skipping over some essential parts. Here we use the download command to grab the raw data directly from his site.
Now we need convert the raw dataset into something more usable and reusable. I have chosen to use HDF5 as the transportable on-disk storage format and zero-padded the images so that they are now 32×32. Use the convert command to perform this step.
We can take a look at the contents of this file by using h5ls working/mnist.k5
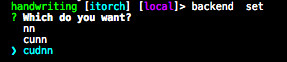
Now we need to make sure we are using the right backend. With Torch, we have three options {‘nn’, ‘cunn’, ‘cudnn’} which are a CPU only version, a CUDA accelerated version, and a CUDA accelerated version using cuDNN optimized library respectively. No need to remember as a menu is presented when you run the av command, backend set Then select ‘cudnn’ and press [Enter]
What is happening behind the scenes here is that av has recorded your backend selection, so when we run train it will use the selected backend. There is another setting that is also important to note. In purple, on the command line prompt, you might have noticed the text ‘local’ which says that all commands are being run locally. This project is setup to also run within a docker context. README.md had details if you are following along and want to play with that.
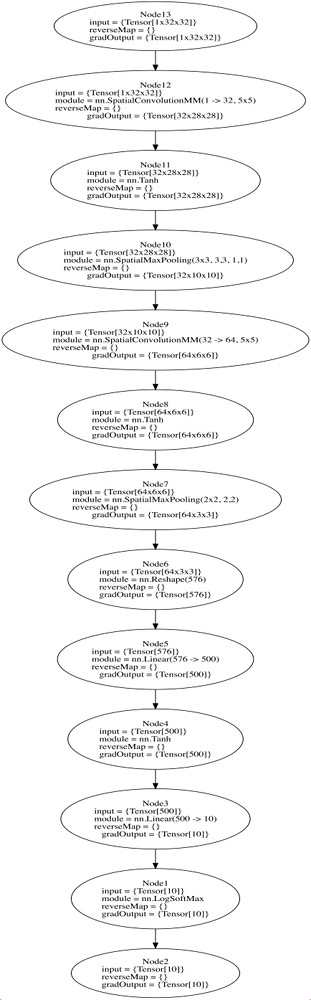
We are using a network defined in the torch demos repo which consists of three stages and ten layers. You can use the graph command to duplicate this yourself (requires qlua which we haven’t talked about installing yet)
Now its time for training. For a quick run, just run train, but this only uses 1/30th of the MNIST dataset. Run train --full to run on all 60,000 images. Based on the systems aailable memory, you can also specify the --batchSize in number of samples and also specify how many --epochs you would like to run. Here is some example output:
The output is saved to a Torch specific file at working/model.net And can be loaded off disk to the GPU and evaluated against the test dataset with the evaluate command. With the full data set, I was able to get to 98.49% accuracy with the command train --full --epochs 30 --batchSize 100
I haven’t mapped this particular network to the CNNs listed with test error rates on Yann Lecun’s MNIST site, but on the surface, it appears consistent with early CNNs without distortions.
Summary
Wasn’t that fun! There are a couple key take aways from my perspective that I would like to discuss. The performance of cuDNN is really amazing. In fact, the Jetson TX1 with cudnn is way faster than my MBP running with the ‘nn’ backend. And the TX1’s fan didn’t even go on until it was cranking on training. Thumbs up Nvidia.
We developed a very repeatable set of steps that could be used on any dataset or Deep Learning frameworks…all within av:
Initially, I thought about just downloading an already trained network…but that is very difficult as of today. It shouldn’t be and I think there is a major Engineering gap in the Deep Learning community. The framework makers {‘Google’, ‘Facebook’, ‘Microsoft’, ‘U.C. Berkley’} seam to not have put it all together and are instead focused (as they should) on the framework and pushing the accuracy percentage forward. This had given me motivation to work toward the k5-specification that I hope will solve ability to transport learned knowledge across frameworks. Stay tuned!